xiphmont: (Default)

The latest of the 51nb upgrade mobos for classic thinkpads is the X210, a drop-in replacement motherboard for the X201. It's a Kaby Lake with lots of goodies, and it makes the screens that were available for a stock X201 seem even more limiting (that is, unforgivably crappy) than they were when the X201 was new.

People have always stuffed better screens into an X201, and that's been taken to new levels with the advent of the X210. It sports the original LVDS connector, but also has a weird two-lane eDP connector (apparently matching a popular Chinese screen) along with two more unexposed eDP lanes unexposed but accessible.

The thing I always hated about the X201 was the miles of bezel in a lid more than thick enough to swallow a much bigger screen. Well, that and the 16:10 ratio. The X61 will always be my fave for being 4:3.

That said, the dimensions suggest it should be possible to fit a pretty good sized modern 3:2 screen. One 51nb modder went to heroic lengths to fit a 12.9" Chromebook screen, but it required losing the latches, the status LEDs and a decent amount of internal bracing. And custom driver and backlight hardware. I had one of these screens and verified the fit was.. difficult at best. I wouldn't trust what was left of the lid after stuffing the screen inside to handle any kind of abuse.

But since then, LG released a 13.0" 3000x2000 that's physically smaller with a larger active area and no special electronics needs, part number LP130QP1.

I ordered one. It arrived today.

It will fit without heroics, though I'll certainly want to brace the screen (so incredibly thin!) But does it light?

Why, yes. Yes, it does.

Time to make another custom PCB and matching flex cables!

xiphmont: (Default)

tl;dr summary: many (most?) of the 12" HV121P01 SXGA screens with a 'bathtub ring' or 'retro-tv' effect around the edges are not defective, VR1 simply got knocked out of adjustment.

THE WHOLE STORY:

This is one of those occasions where I feel like a complete idiot and simultaneously wonder how nobody else noticed this before.

I experimented a while back with chemically stripping the front glass off HV121P01-101 screens, since these were plentiful (at the time) but you had to remove the glass and bonding adhesive to use them in an X61/X62. Mechanical stripping is labor intensive to put it mildly, and using xylene or alcohol seemed like a useful shortcut. It worked, but it also damaged the polarizer films in exactly the way illustrated in the picture.

At the same time, people were getting reclaimed screens from China showing the exact same effect. I got one or two of these myself, and the polarizer films were in fact damaged just like I saw on the screens I stripped.

And I assumed from there on out that chemical/heat stripping was the only explanation of the effect. Which turns out to be terribly wrong.

Most LCD screens have a variable resistor adjustment as part of a temperature/drive compensation circuit. I played with it on many screens in the past, and it was a way to alter either the absolute drive or overdrive speed of the entire screen, usually affecting gamma and contrast in some fashion.

That's not what it does on an HV121P01.

I was modding some of the screens I'd recently bought for LED backlight, screens which I'd tested carefully on receipt and found no defects. After modding, three turned up 'bathtub ring' defects when tested. The defect appeared spontaneously, and others had noted this happen after doing an LED mod. At the time, this was deeply disappointing, perplexing and expensive. I was not going to sell any defective screens no matter how subtle the defect.

Did the LED mod cause the fault? It had been near 100% humidity in NH all that week, did that do it? Was it a fault that was always there and only showed up with LEDs? Or was it always there and I had simply missed it?

I peeled and inspected the polarizers on one screen; this panel had a replacement polarizer that was glossy, so it wasn't going to be saleable anyway. And if chemical stripping had caused the defect, missed till now, why did the *replacement* films show the problem? They didn't, in fact--- after removal and testing, they were faultless, perfectly regular in every way.

I queued up a second panel for testing (I didn't want to burn my own replacement films on a potentially bad panel). Everything about it looked perfect until I was displaying low-brightness gray-to-gray stipple patterns, and that's when the bathtub pattern appeared. Could it be some sort of mismatched signal drive? I looked at VR1, which I'd never touched because I was sure I knew what it did.

So I tweaked it. And the problem got worse. I tweaked it the other direction and the problem disappeared.

I'm still testing in detail to make sure this isn't multiple unnoticeable problems stacking up into a noticeable one, but it sure looks to me right now that this is an adjustment to balance panel drive in the center versus the edges of the screen. It's normally fixed after adjustment at the factory with a little lacquer, but it's not the slightest bit surprising it might get knocked loose or dissolved during rebuilding or modding.

VR1 probably can't mitigate a genuinely frotzed polarizer but it's obviously worth trying it just to see if it was never the polarizer at all.

xiphmont: (Default)

Following up on my previous post about finding a source of legit NOS 12.1" SXGA screens for X62 builds, the most recent batch I ordered was not all roses. So proceed with caution.

First and foremost, these screens definitely are not and never were true NOS. Since getting a few duds (more in a bit) I've dug through all their ROM contents, and the model and serial numbers don't match up between components. In fact, I think whoever's rebuilding them has access to equipment for heat-bonding flex cables, because I don't think all the controller boards even match the glass matrices.

That's not really a problem in and of itself. These parts were mostly interchangeable, and I approve of not wasting good bits if you can mix and match them into perfectly good screens.

Unfortunately, I've gotten a few screens with glue seeping into the diffusers, and using replacement polarizer films that don't match OEM. The semi-unforgiveable sin was a few panels showing up with *glossy* front films.

Overall, I've still had better luck overall with these screens than most of the rebuilds I've bought in the past. Four years ago, crappy rebuilds were going for $300+. Even if I'm getting a few duds I'm not going to pass along, the hit rate is still better than it has been in a while.

xiphmont: (Default)

There's some good LCD news though-- I found a seller who's trickling out small numbers of refurbished HV121P01-100 screens, and unlike all the others I've sampled in the past several years, these have so far been excellent. Yes, they're rebuilt, but they appear to use entirely genuine, model-appropriate parts. I have no idea if these are parts from B-grade panels being reassembled into new screens or what, but the results are NOS visual quality.

There's a 'downside': he actually seals the panels together with black RTV silicone. If you want to open the panel up to do further surgery, you can't. Or rather, with a thin spudger, a ton of patience and very very steady hands you can, but slip once and you'll crack the matrix. I did open some up to have a detailed look--- Yup! All genuine inside!

If you *don't* have any reason to open the screen up, the black silicone is a good idea-- it keeps grit out, and prevents the dreaded 'white spots' from ever developing. I've considered building screens this way myself, so I actually approve.

I'm importing a few of these for conversion to LED. If you want one, contact me about it. If you want to order directly yourself, it's item #710816705 on AliExpress. I have no idea how many per month he can actually make, or if the quality is going to hold up, but so far, so good!

xiphmont: (Default)

I've previously regaled you with stories of poorly rebuilt SXGA+ screens being sold as new that are the bane of X62 builders. Whelp, I'm beginning to think just about every in-demand LCD panel on AliExpress stands a good chance of being a barely serviceable, cobbled together pile of poo. Usually sold as "NEW" or "GENUINE" or "100% ORIGINAL" of course.

I'm building some T70s now, and the screens folks like to have in these are the IAQX10 2k 4:3 AFFS screens from the old IDTech joint venture. Like the SXGA screens for the X62, these are long out of production, still in demand, and hard to find in the wild. I've been working out how to mod the much thicker industrial -M version, which uses the same matrix, to work in a T70.

While I'm working that out, an IAQX10N seller pops up on AliExpress. The screens are expensive, but a genuine laptop version of this screen should be expensive at this point. I decided to buy just one so I had a comparison for my rebuild efforts.

Screen arrived, and lo and behold, it's a cobbled together pile of poo.

Immediately upon opening the box: the screen has a gloss front polarizer film. Uh oh. Stock is matte. Looking closer, it isn't even cut straight. Like, guys, at least use a straightedge.

Well, let's see if it at least works... and find it has a blank EDID. Uh huh. OK, let's get an IAQX10N EDID into it...

and we get:

The background on that screen? It's not supposed to be blue. It's supposed to be black. No, I didn't mess with the photo. 'Black' really looks like that. It's measuring less than 100:1 contrast; that blue is backlight bleed-through.

And the diagonal stripes? Not a trick of the picture. They're really there. It's Moiré patterning from using the wrong prism films for the given DPI, or not tacking them in-place and having them shift in transport.

This may well be the worst refurb job I've seen to date without being bent or cracked. Actually, I take it back, the outer frame is also slightly bent.

But hey! I'm only out $100 in shipping once I return it!

(In case you were wondering, the protective plastic film is still on the front of the screen in that picture, so all the bubbles and scratches are not real defects. But it does mean they did a lousy job putting the film on.)

xiphmont: (Default)

I've modded nearly 300 X61 inverters to drive LEDs over the past four years, and I thought I'd seen all the possible FRUs. NOPE.

Not listed in the hardware reference or parts cross-reference: the Sumida FRU 41W1024. Undeniably an X61 inverter.

And here it is, before modification, for reference purposes.

xiphmont: (Default)

The prototype boards are back from OSHPark. Dang, they did a really nice job.

Not perfect, but the cosmetic errors are mine; I submitted the protos to about 10 online PCB joints to see who'd actually make them to my DRC spec, and a few bits like silkscreen holdoff didn't actually match everywhere. I can adjust that for a real run.

OSHPark was one of two places willing to do 6mil/6mil 2oz without several rounds of human intervention. The other is DirtyPCBs, and I can't wait to see what comes back from there. Suffice to say I hope they're serviceable (as they're about 1/10th the cost in batches of 100), but it's highly unlikely they'll be as nice as this.

Maybe I can push the rest of the BOM to be able to afford the difference, I really like these...

xiphmont: (Default)

Summary: Most 'new' HV121P01-100 SXGA+ screens for sale on ebay, AliExpress, etc, are neither genuine nor new.

Long version:

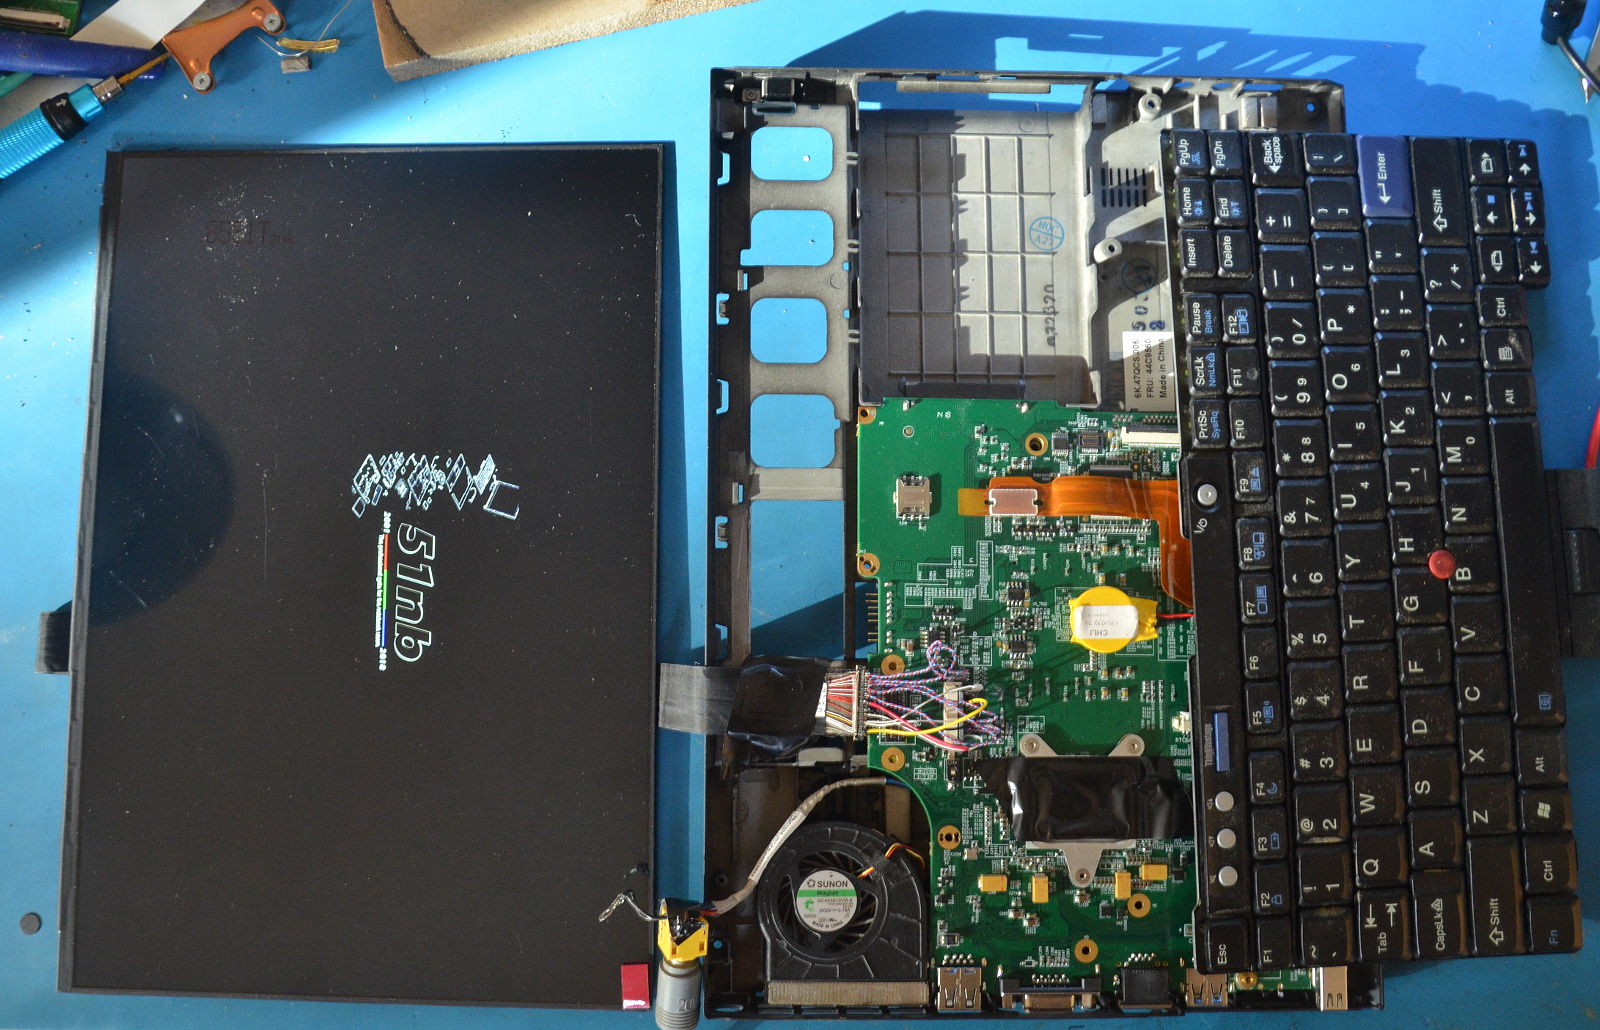
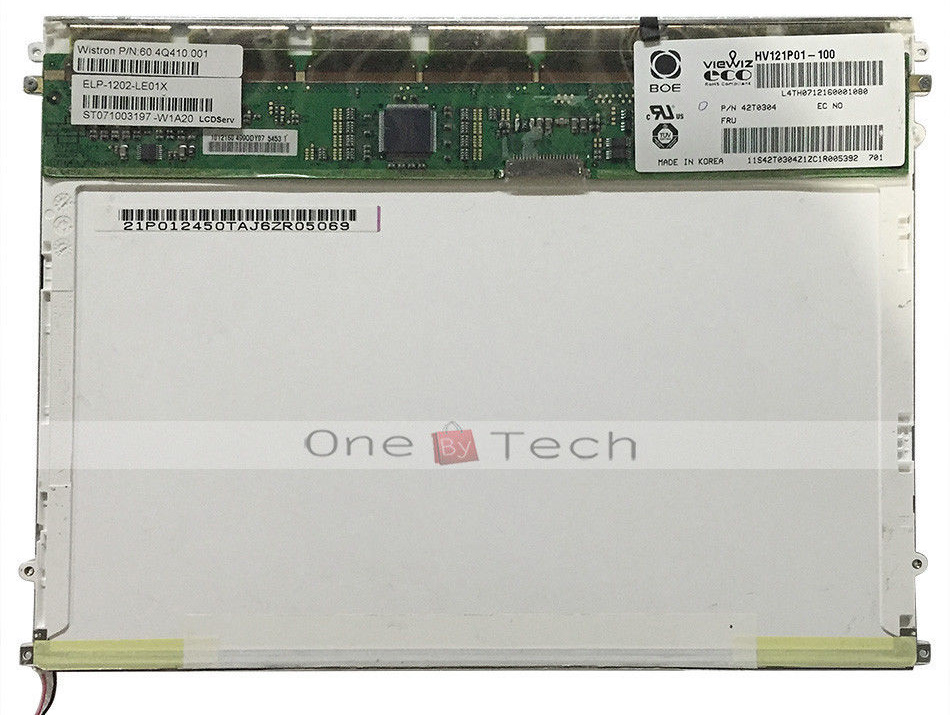
The HV121P01-100 is the screen every X60/61/62 ThinkPad modder wants. It's a reasonably high-resolution AFFS (IPS-like) screen originally offered as an option on the X60 tablet, and with a Daylight LED kit, it has excellent brightness and good (though not excellent) color accuracy. They're commonly available on eBay, Alibaba, DHgate, etc.

Except they're not.

A slightly later version of the screen, the HV121P01-101, was an option on the X61 tablet, but it had a fatal flaw. Unlike the earlier version, the -101 was bonded to a glass front-surface using a 'permanent' optical adhesive. This adhesive was not in fact very permanent. It flowed when it got warm, leaving bubbles behind the glass, and a sticky, impenetrable goo all over everything.

Ever get pine sap all over your hands and try to clean it off? Same thing. No really; the optical adhesive is a purified pine tar. Mmm, I do love that Christmas tree smell.

In any case, the HV121P01-101 turned out to be a warranty disaster and there were tons of these screens left over that no one could use.

A few modders got reasonably good at removing the front glass and adhesive through sheer force of will and infinite effort. This task is seriously involved. I tried it. I wasn't patient enough to get better than about a 50% success rate and it sure wasn't worth the time--- especially when you could just buy a -100 version of the screen without the problem.

These days, there are no more cheap -100 screens. Enter Chinese entrepreneurs and a large quantity of similar, unsold -101 screens.

Rather than spending hours of careful mechanical work removing the glass fronts and adhesive from the -101 screens, you can just dump the screens into a big vat of hot solvent. Of the solvents I've tried, xylene is cheap and works well. The solvent dissolves all the adhesive away over a few days, and the glass falls right off. No fuss!

This would be a brilliant solution except for one problem: it messes up the front polarizer film that's also bonded to the glass LCD matrix.

Good polarizers cost more to produce than the glass LCD matrix itself. BOE/Hydis used very nice polarizers on these screens. Removing the adhesive with heat/solvents damages this expensive polarizer.

The damage looks a little like a kind of 'old-timey picture-tube' filter:

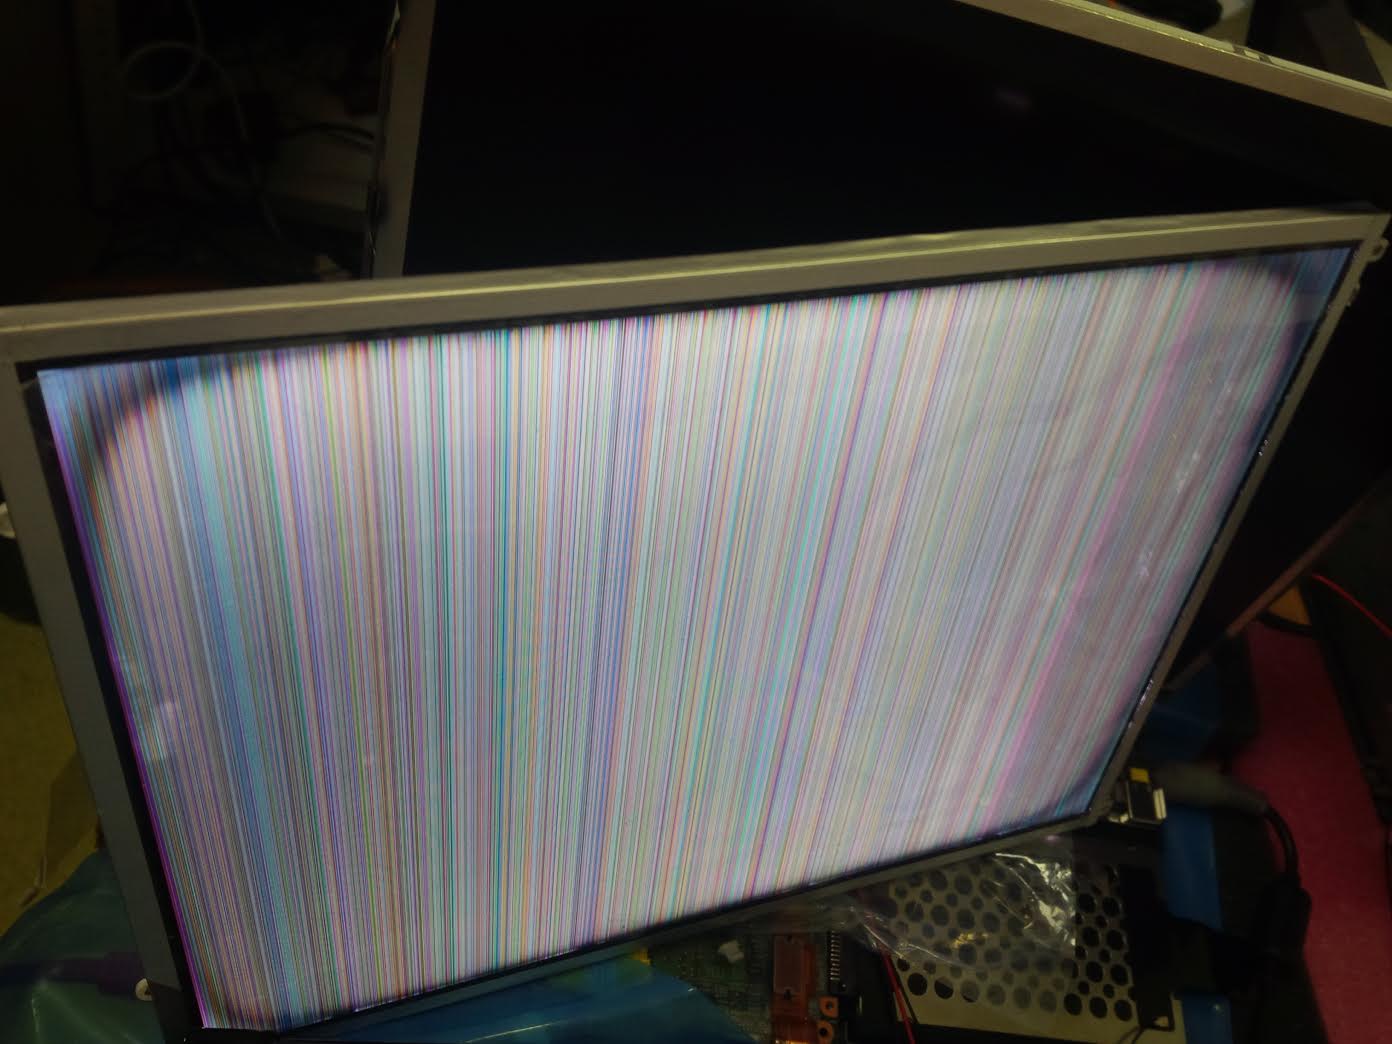
The above screen was being fed vertical lines for whatever reason, it's the ring of discoloration around the edge I'm talking about. Below is a more subtly damaged screen that wasn't obvious until the backlight got replaced:

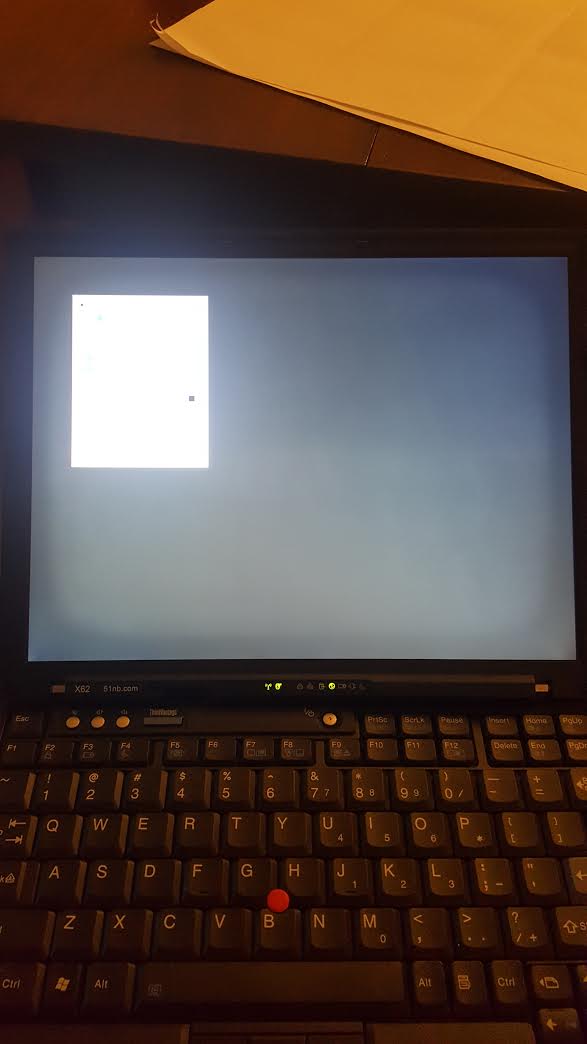
Depending on the exact process, the damage can be subtle or obvious. If the damage isn't 'too bad', the screen is just sold as is, and these screens are definitely out there in the wild (see above). I know a few people who didn't notice (or weren't bothered by it) until installing a brighter backlight that made it more obvious. That's how I got the pics (thanks guys!).

When the polarizer damage is too obvious, the screen rebuilder can strip off the damaged polarizer film and install a new one. Like I said, the best polarizers are really expensive, and I will say from personal experience that these rebuilders are, in general, not using the best polarizers.

Cheap polarizers make for poor contrast, and cause color shifts at an angle which kind-of negates the whole point of the fancy AFFS screen.

Honest resellers are up-front when the polarizer has been replaced, and the protective platic over the surface of the new polarizer will still be there when the screen arrives. Maybe you'll get lucky and it'll be a decent one. There's no way to tell ahead of time, but I personally won't bet on it.

The less honest resellers won't tell you, or will claim the screen is all new. Right now, this is also easy to spot!

BOE/Hydis original polarizers are always beveled at the corners:

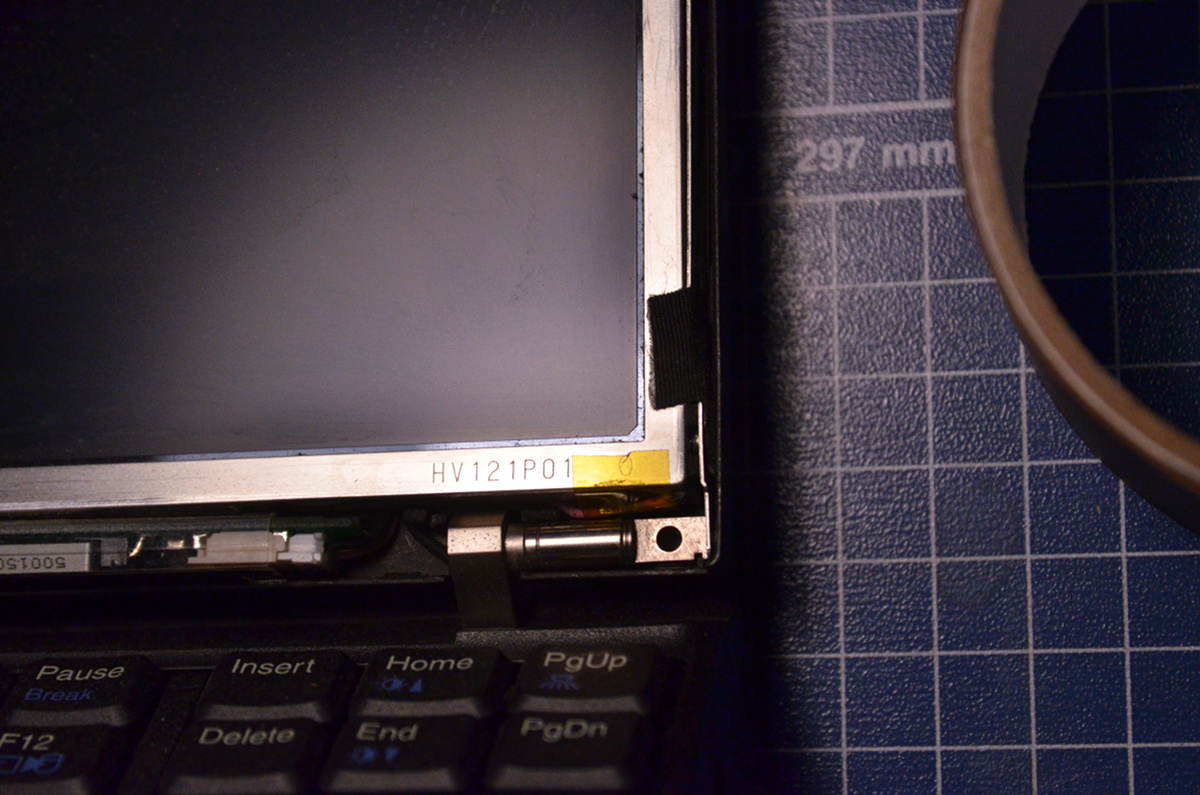
Replacement polarizers are not:

I suppose dishonest rebuilders will eventually catch onto this trick and begin beveling their edges too, but so far they haven't.

Oh, and it can get worse.

Solvents will also destroy most of the other components in the screen. Some rebuilders carefully separate the parts and only dunk the glass matrices, limiting the damage to the bonded polarizer. Others just dunk the whole damned screen and let everything dissolve except for the frame, electronics and matrix. These screens then have to be built up entirely from spare parts.

In short, many of the HV121P01-100 screens you see for sale *don't have a single HV121P01-100 part in them*.

Those stickers that say 'HV121P01-100'? Fake, altered, or transferred from other screens. That closeup of 'HV121P01' stamped into the front frame? Note that it doesn't say '-100' or '-101'.

Conclusion:

Do these rebuilt screens work? Yes. The problem is that many aren't going to be anywhere close to the original performance specs. The contrast will be lower, the brightness low/uneven, the colors poor or unstable, at least relative to the original screen, which was no performance monster to begin with.

Is that still worth ~ $100? You might say yes! The important thing is to know what you're getting and be able to make an informed decision. Otherwise you're playing a lottery and trusting the ticket-seller to tell you if you've won.

Of course, you might get lucky and get a real -100! If you do, let me know, I've not seen one in years, and I'd really like to know where I can get some.

So how do I find a real HV121P01-100?

No guarantees, but look for a few things.

  • Is the front 'glass' (acrylic on a real -100) still in place?
  • Is the original digitizer still on the back? It's the rust-and-green flexy circuit board that provides the pen input on the tablet screen.
  • Does the screen still have its tablet-mounting tabs?
  • Is any of the frame tape cut, or are the internal diffuser film clips mysteriously missing (probably because the replacement diffuser films don't actually fit properly)?
  • Is the listing using a stock pic (with a custom watermark) used by ten other resellers? Bad sign.

Not to pick on this specific seller (I doubt they know much about what they're selling), but here's a pic that hits almost all of the red flags all in one ad:

The digitizer is missing, the front acrylic is missing, the clips that hold the internal diffuser films in place are missing, the sealing tape along the bottom of the frame is cut, and the plastic cover with the 'HV121P01-100' sticker and serial number has obviously been transferred from another screen. Best of all, this is a stock pic, or rather, the exact pic is being used by 6 or 7 eBay sellers right now. They care so little about their listing, they're using a pic of a screen that's obviously been rebuilt from parts, not even trying to hide it, and the screen is listed as 'new'.

WELL DONE. I TOTALLY TRUST YOU.

In any case, the best way to screen out sellers is probably just to contact the seller up front and ask specific questions. Most are just resellers, and have no idea what they're selling, but you can at least ask for pics of an actual screen for sale. Any evasion from the seller is a pretty good indication you should walk away.

xiphmont: (Default)

When I first offered LED conversion kits, I got the inverters I modded for free from forum members who sent their spares, supplemented by bulk lot buys of used boards from eBay. For the first 200 kits or so, I paid on average about $5 a board, which I then modded with the custom LED hardware.

The supply of X60 and X61 inverters is drying up, which is not to say they're no longer available, but they're now well into legacy pricing. Min price is about $20 apeice now.

Building complete inverters from scratch was probably always cost effective, but I just couldn't find the discontinued connectors I needed. I think I have those secured now, so I spent a few days of free time consing up a new inverter board design.

The prototype is off to OSHPark for fabbing! It's nearly the same schematic as the TLD3, but the layout is from-scratch to make it easier to assemble.

Pseudorama

Nov. 29th, 2017 07:48 pm
xiphmont: (Default)

I'm about to ship my 250th ThinkPad LED backlight kit, all hand-assembled and soldered. I had no idea. I expected there to be demand for about ten. The kits are for models over ten years old... and demand is still increasing.

Not pictured: The stack of 30 different headless ThinkPads I use for kit testing.

xiphmont: (Default)

...so yeah, I'm apparently also in the custom Thinkpad LVDS cable business now. This one lets an X61/X62 motherboard use a 4:3 12.1" SXGA tablet screen. I'm still practicing, but I've found a source for 100 cables cheap...

xiphmont: (Default)

....w00t! Found the missing Thinkpad inverter stash! That should hold me through Christmas.

xiphmont: (Default)

Another catch-up post.

A few weeks ago, I accepted my first order for a T43 backlight kit. It turned out to be a c-c-c-c-c-combo-breaker!

In the early days of software-controlled brightness, ThinkPads used an analog brightness signal like just about every notebook. It was generated by one of the D-to-A pins on the embedded Renesas H8S microntroller all ThinkPads used.

As of the X40, ThinkPads went to using a digital PWM brightness control generated by the Intel Centrino ICH Southbridge. This made them kind of weird by laptop standards. It's one of the reasons I had to cons up custom LED drivers for my ThinkPad brightness kits.

In general, the T and X series of the same generation shared a basic architecture. The planars were quite different, but the chipset and basic design were the same. Not so with the T4X and X4X.

The X40-series is a completely different design from the T40-series. It uses a PWM brightness control. The T40, however, is analog like the older machines, which threw me for a loop at first. The good news is that I'd made working drivers for the X2x, X3x, T2x and T3x beforehand, so once I realized the T4x was an 'old' style, getting it to work wasn't hard. I can use the same positive-analog TLD2 hack that worked on the earlier models.

The bad news is all my fabrication, based on the TLD3, is geared toward the PWM-based ThinkPads. The TLD3 boards aren't able to use a positive-analog brightness signal no matter the hack. For a TLD3, it's PWM input or nothing.

I have on hand ~ 1500 TLD3 PCBs, waiting to be populated, for the usual PWM kits. I have only ~ 20 TLD2 PCBs left that can be pressed into analog use.

Get 'em while you can.

xiphmont: (Default)

Packaging of the Chinese backlight kits I used to order tended to be... disappointing. Parts arrived broken on a regular basis, and there was never any moisture or static protection.

As a result, I put a little effort into my packaging.

With a paper cutter and an impulse sealer, it's easy to make moisture and ESD-proof bags of any size. The little table around the sealer was a quick afternoon toss-together made of MDF and a quick layer of paint. It locks into the lip along the bottom.

And of course, I make my own boxes! ThinkPad modders have taken to calling them Toblerones, which is kind of obvious, really.

xiphmont: (Default)

The ThinkPad LED backlight kits consist of two major pieces; an LED strip and an LED driver. The driver boards are designed to fit onto existing CCFL inverter boards after removing the CCFL step-up coil.

For good measure, I pull off the CCFL driver chip as well. Simply disabling it doesn't keep it from drawing a [very small] amount of current.

Removing the driver chip also opens up additional possibilities for reusing traces on the existing PCB. I don't like running long wires across the width of the inverter when hooking up the LED driver board. They'd need to be glued down to avoid accidental snagging, and that's a complication I don't need.

Instead, I re-route power, ground and the ENA and DIM signals through the original board, using solder bridges and 0-ohm bridge resistors where possible. On most boards, one or two jumpers are still needed, though a few boards I can get away without using any.

This work is most definitely all done under the microscope.

That also reminds me-- I need to get my library of reference modification pictures up somewhere.

xiphmont: (Default)

The first step is admitting you have a problem...

The problem being, specifically, that this stuff does not come in gallon cans.

xiphmont: (Default)

The LED strips are the big reason I still pick-and-place everything by hand. My tolerances here are just a few mils, and I've machined myself steel-and-aluminum templates to make the placement easier.

The idea is actually to place with looser tolerances, dropping the LEDs into the trough where the strip is clamped the check spacing and orientation with the microscope before reflow.

During reflow I tighten the guides on the jig and level the LEDs using a little precision squeegee I made out of aluminum and high-temp silicone.

Once the strip cools, I can pull it out of the jig, remove excess solder beads under the microscope, check for obvious defects, test on a power supply, and wash down with flux remover. Then it's on to applying the teflon layer, soldering pigtails, an up-to-temperature burn-in and flex test, and finally packaging.

xiphmont: (Default)

Initial functional testing of the LED drivers is just to find obvious reflow defects, mostly solder-bridges and non-obvious tombstoning.

Read more... )

xiphmont: (Default)

I'm currently on rev 3 of my ThinkPad-specific LED retrofit driver boards. They fit into the space on a stock inverter freed up by removing the CCFL step-up coil.

I'm on pace to make about 200-300 kits this year, and I'm still making them all by hand. Solder paste applied using a pneumatic dropper, components placed using tweezers and stereo microscope, then reflowed using a hotplate (thus the little placement jigs with silicone handles).

more after the cut... )

xiphmont: (Default)

LEDs and LED strip PCBs are finally here!

So now it's time to catch up with the LED backlight kit orders, aka, I know where all my free time is going the next few weeks...

(Does anyone else still remember the Dunkin' "Time to make the donuts" commercials?)

Profile

xiphmont: (Default)
xiphmont

Syndicate

RSS Atom

Most Popular Tags