NPPP: Laser Fuser back from Heaven
Jul. 6th, 2017 01:48 am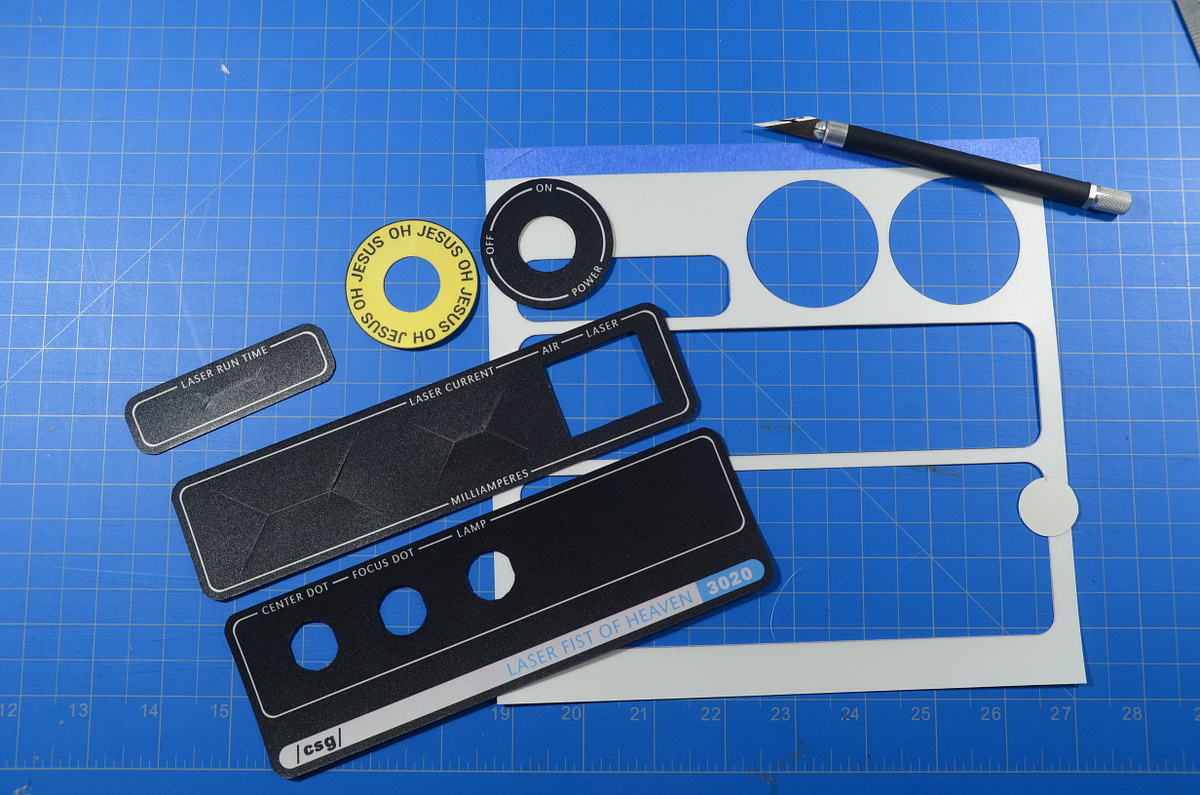
With the printer fuser repaired, I was able to get a good overlay print onto Papilio white self-adhesive polyester. Setting the print type to 'labels' produced the best result by far.
Then I cold-laminated a protective textured vinyl overlay onto that. It took a few attempts to find a technique that proces a good lamination with no bubbles, but here we are!
NPPP: Laser Fuser of Meh
Jul. 6th, 2017 01:13 amWhat good is a tool if you don't know what it can and cannot do?
...and that is how I lost a round of fuser roulette with my laser printer.
I was running self-adhesive polyester through the printer in some test runs for the control panel overlays, and a sheet separated from the liner in the feed, the adhesive on the folded-over corner caught the fuser, and, well, that was that.
"Paper jam in tray 2"
The good and rather unexpected news: Despite other failings, HP is still publishing highly-complete tear-down and service manuals for its consumer printers, and my M277dw was no exception.
The fuser is not a user-replaceable part, and the printer is not designed to be easy to disassemble. It took me almost an hour of work to finally extract the fuser unit. But everything came apart according to the manual, and although the fuser wasn't intended to be disassembled either, it too broke down without fuss. Another half hour of slowly peeling sticky, melted polyester off the roller later, I had it clean.
And, miraculously, after getting everything back together-- the printer still worked perfectly. No damage. Whew.
In any case, lesson learned: From now on I run my adhesive media with a masking tape leader folded over the front edge.
Most makers I know keep a bunch of paint colors around.
Me, I have a few primaries and maybe 40 different whites. Nothing messes with me like THE WRONG WHITE. And yes, I *do* own a handheld spectrophotometer! Why do you ask?
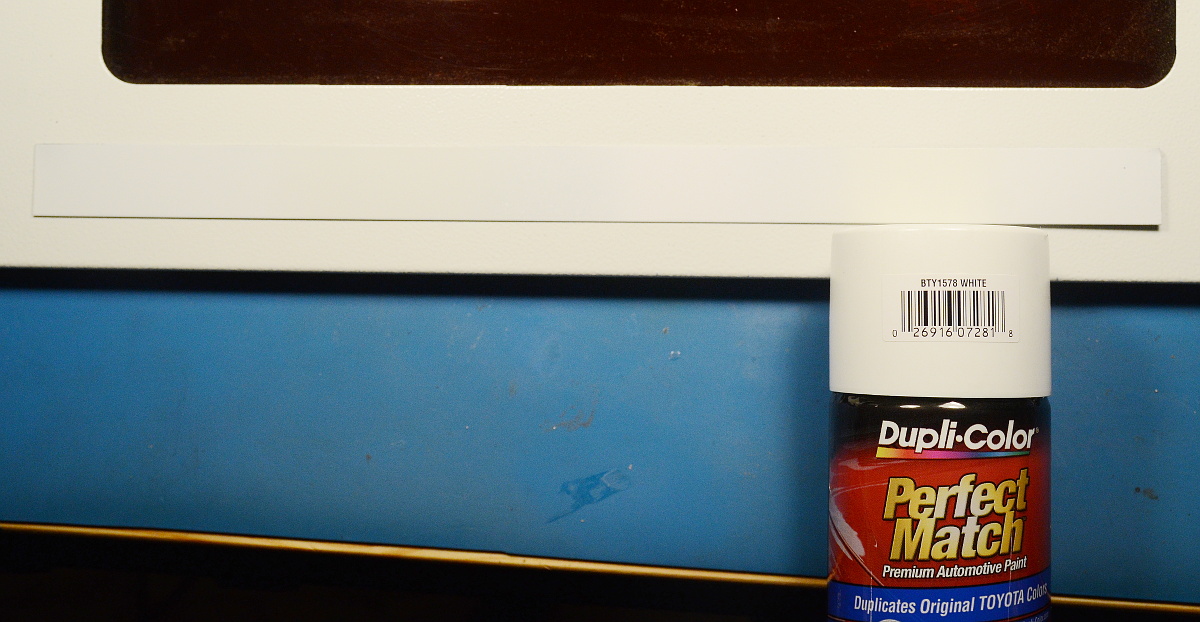
I need to paint my new control panel with a good match to the other panels, so I got out my paint test strips. It's hard to tell, but there are five different white stripes on the particular pictured strip.
Anyway, we have a winner! Spectrophotometer agrees! The laser cutter's white matches Duplicolor 'Toyota White'.
OPPP: Laser Fit of Heaven
Jun. 29th, 2017 06:53 pmThe tack welds for the bend, hinge, and closure are in. It's time for a test fit.
Hmmm.

Not too bad, not perfect. I started the half-inch-radius bend in the front just a smidge too far up the hatch so there's a 1/16" or so mismatch backward and up.
Also, I had a little trouble with one of the tack welds for the right hinge fitting. It's angled up slightly to put the pin at the right height, so it's not actually sitting flat against the 22ga steel the hatch is made of. The not-quite-a-lap-weld Just Would Not Bridge.
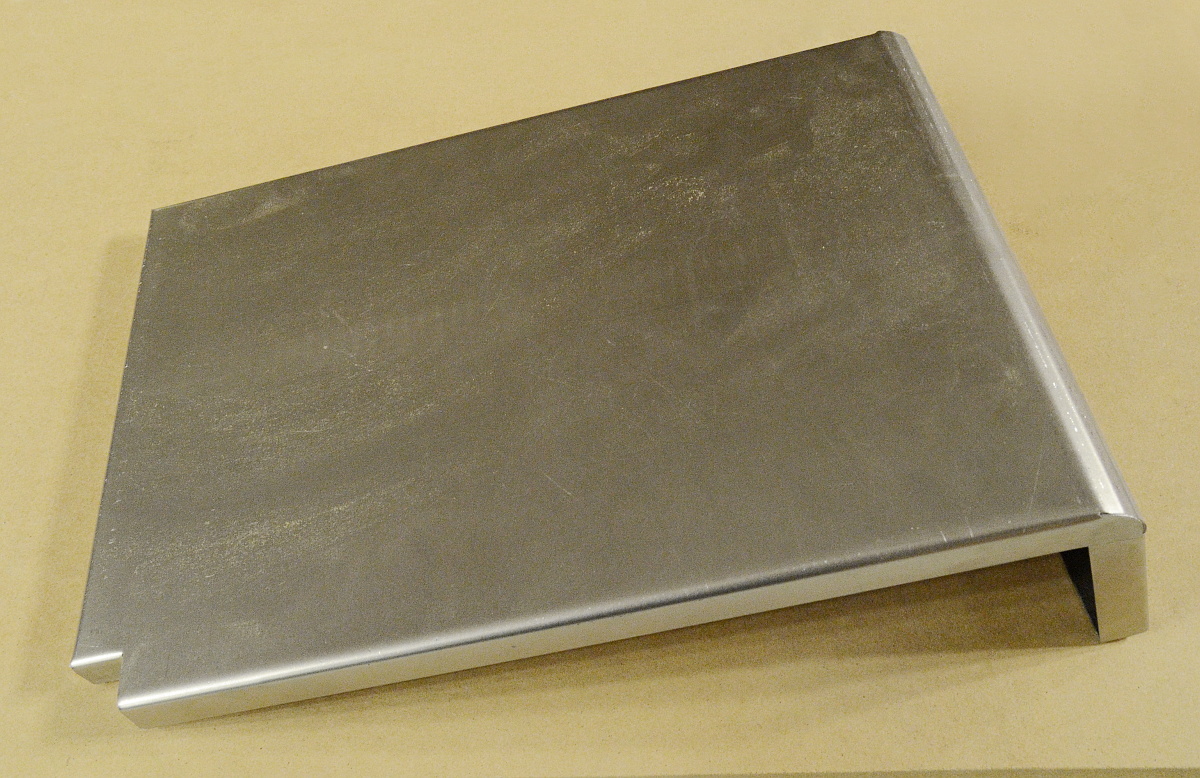
Cranking the amps up to somewhere between Righteous Fury and Raining Hellfire did the trick, but thank goodness for the aluminum chill strip or I'd have punched a dime size hole right through. As it is, it's nothing a grinder can't fix.
I think I'm going with this. It's not like the OEM enclosure is exactly precision manufacture either.
The bending brake has added a third dimension!
Not a perfect job, but not atrocious either.
I didn't notice till after I'd finished that the bend depth adjustment had slipped, so the bends are a little rounder than I'd have liked, but meh. Let's tack weld it and see how well it fits before complaining too hard.
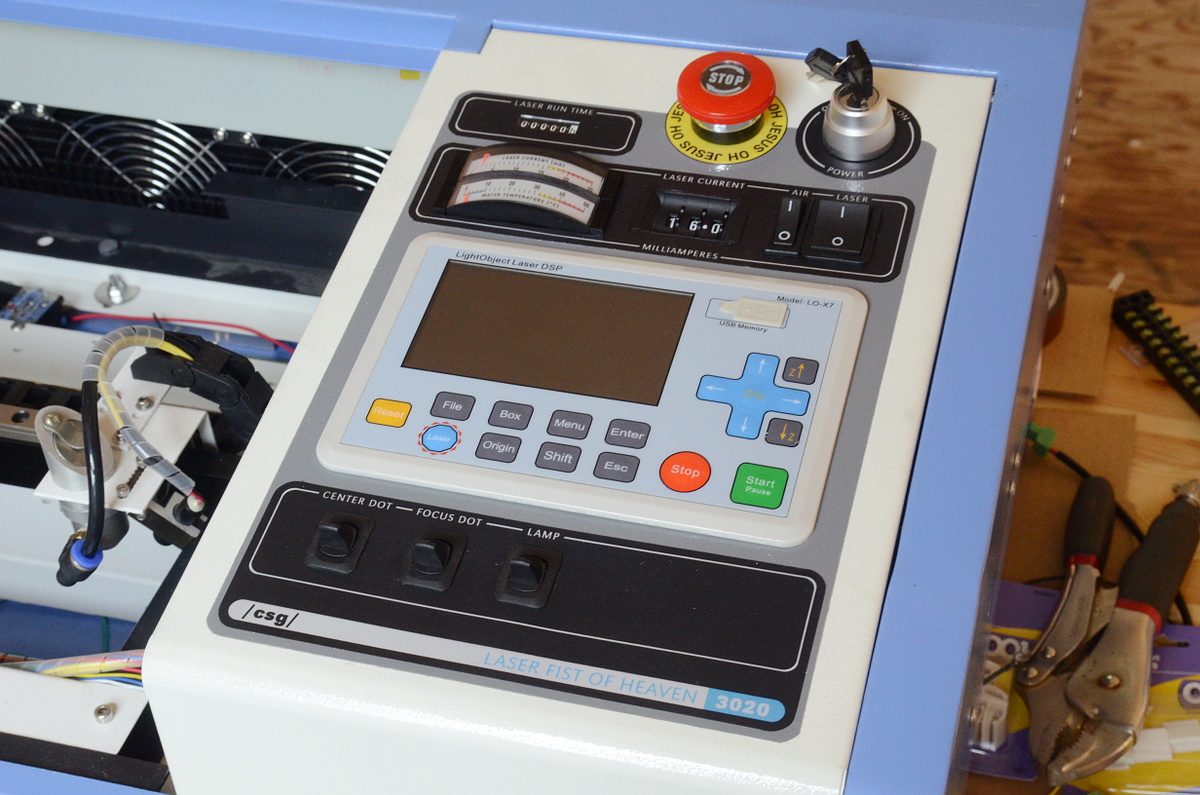
OPPP: the Laser Fist of Heaven
Jun. 26th, 2017 05:08 pmGiven the two laser control panels and the design comparison, what's the actual goal here?
The first goal is functional: I need to add a number of new control and status functions.
Second: I am a vain man, and I want this tool to look a little less hokey. Not entirely, just a little. I mean, I gotta be me.
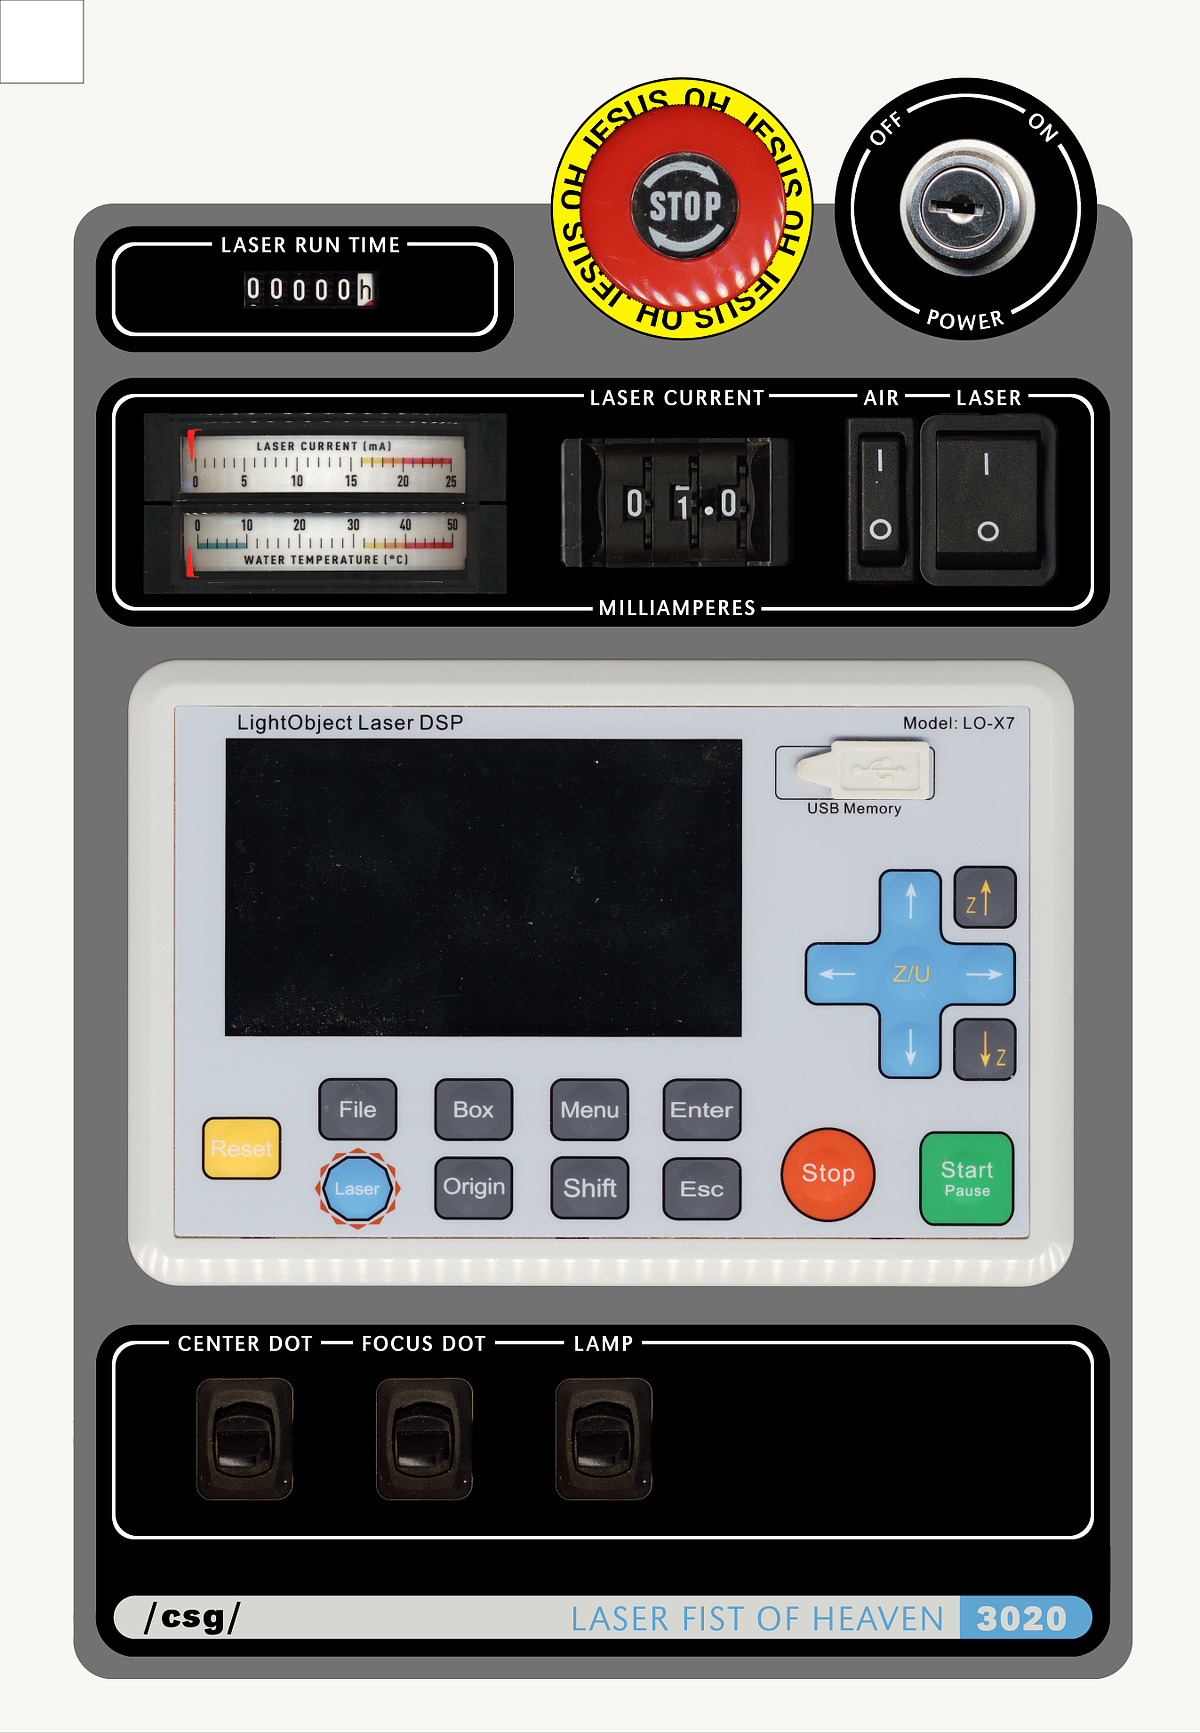
The biggest addition will be a software control for the laser. I somewhat arbitrarily decided to go with a rebranded Anywells controller from LightObject-- I'll find out later if that was a good idea or not.
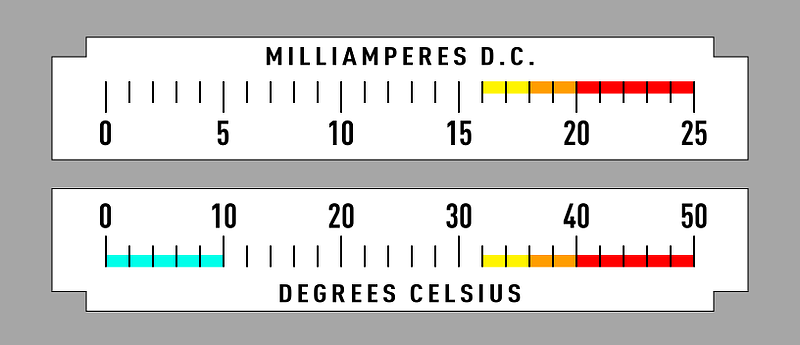
The huge, spread-out, not-calibrated-to-anything digital PWM laser current control gets replaced by a thumbwheel implementing a Kelvin ladder. And instead of a 7-segment LED display that simply goes from 0-100, I'll use a good-old analog meter that measures actual milliampres.
While we're at it, a matching analog meter reads cooling water temperature.
Like on the American control panel, the key switch is the only power on-off, and the emergency stop will be a real immediate-stop interlock.
I have an onboard air assist, so that needs a switch too, along with a lighting switch and two switched laser pointers, one a centering beam and another for focus.
And, why not steal the tube runtime meter from the nifty panel as well? :-)
Last of all, arrange it in a more 'American' style: functions grouped together, consistent labeling, and no angry color salad. And just one or two inside jokes, because the tool is still a bit hokey.
OPPP: Laser Fist of America
Jun. 25th, 2017 09:40 pmFor contrast with the Chinese control panel posted earlier, here's a mid-80's control panel for an American-made laser supply.
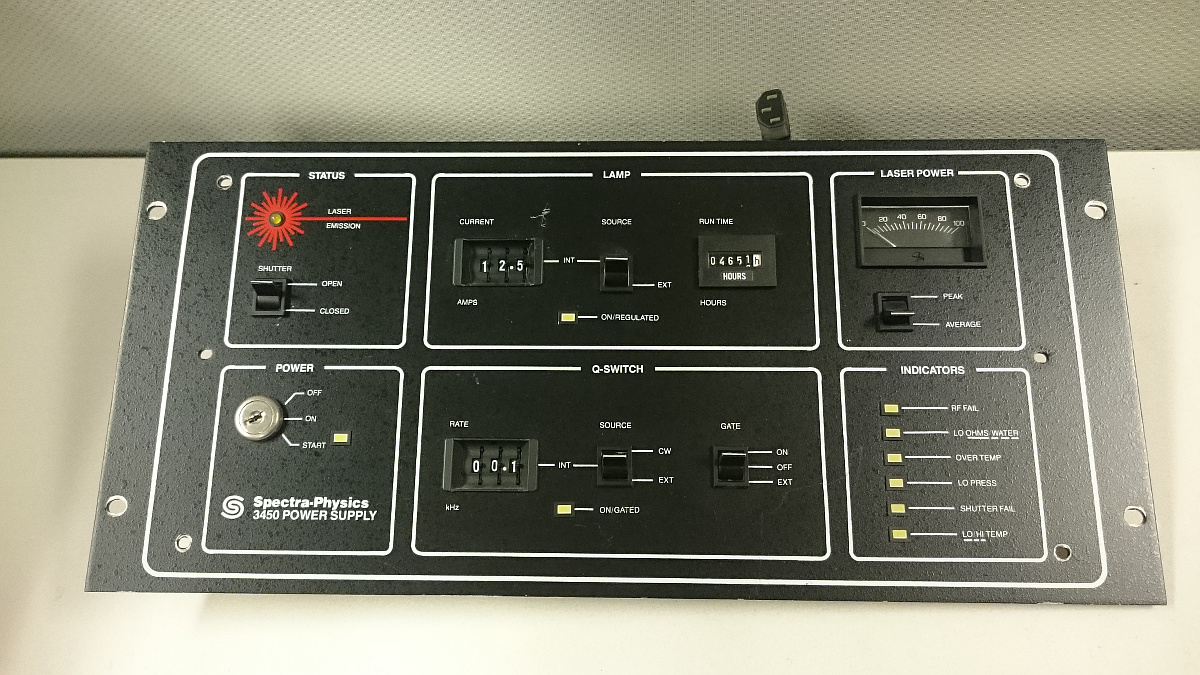
It's about the same size, and roughly comparable, though there's more diagnostic functionality here than on the laser cutter.
Although I do think it's better overall, the big difference is really the aesthetic design. This is an unabashedly '80s American instrument panel. It fills an American geek with warm fuzzies.
BTW, thanks for the panel Taylor! :-) And thanks to me partner Fox for bringing it home for me.
OPPP: Back to the Laser
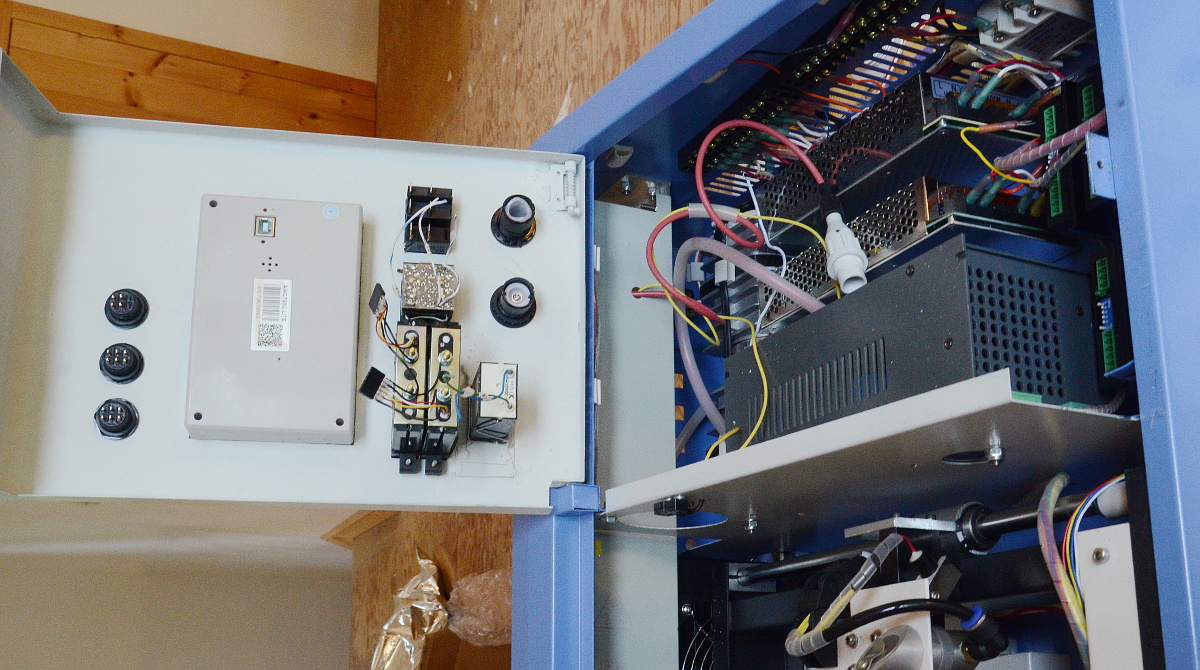
Jun. 25th, 2017 08:38 pmThe control panel for my Chinese K40 laser cutter is very very Chinese. That's not a truism, condemnation, or praise. It is what it is.
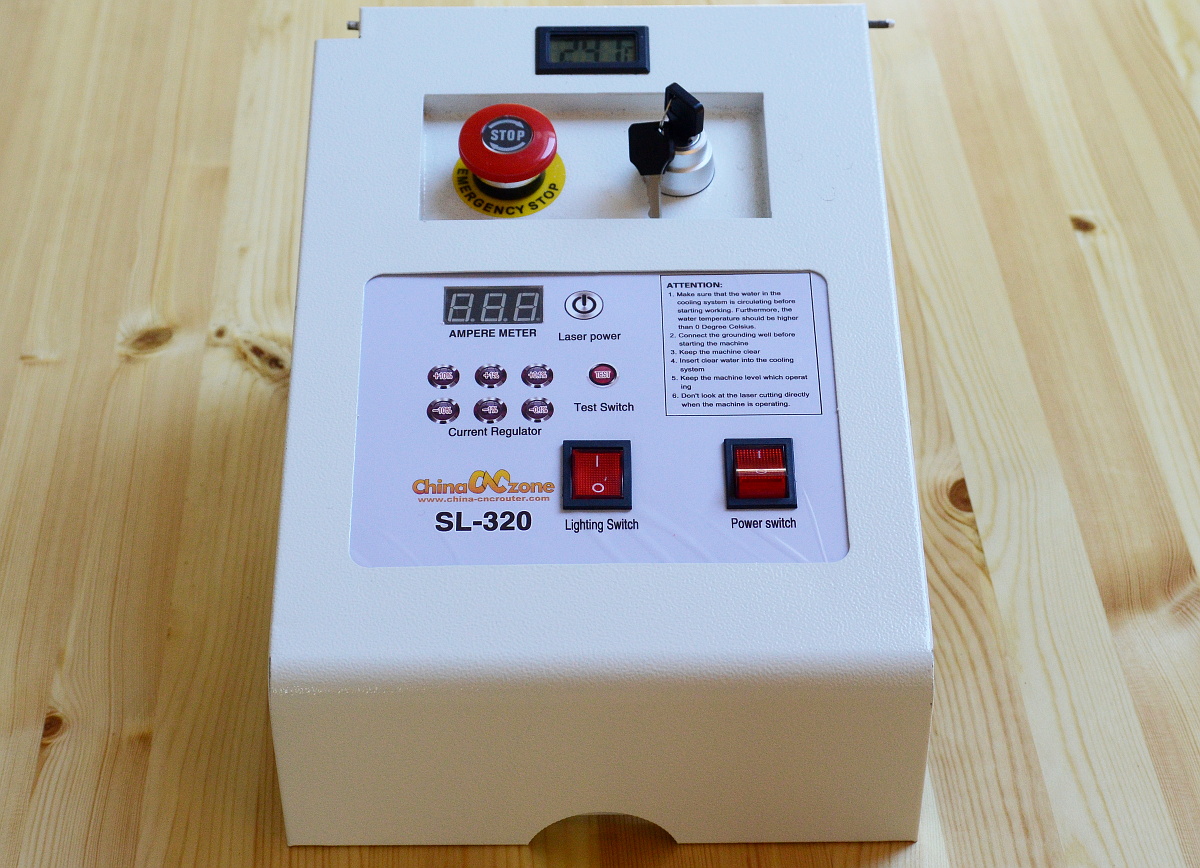
To be fair, it works, and that's no backhanded compliment. But it has a number of functional and design sins my Western eye simply can't leave be.
First and foremost, it spreads precious little functionality over the entire available space. I need to add additional controls and an entire DSP panel, and there's simply no room to do so.
And that's not for the jam-packed functionality. Pretty much the entire 7x5 square in the middle is doing the job of a single knob or thumbwheel. But a single knob would not be 'cool', and so we have this monstrosity of an ampre control that's not even calibrated in amperes/milliampres (despite the legend).
It has three (three!) 'ON' switches wired in series. A rocker, a key switch, and a stop paddle. They all do the same thing.
The temperature gauge, at the top, is simply a little LCD-readout battery powered number. It works, and it's reasonably accurate. But it is hard to read. And it's smack in the middle of space that could be used more efficiently.
I will give this particular kudo: It uses sans-serif fonts, which gets a 'well done!' And there's no Comic Sans.
I won't even complain about the pastel lavender gradient, except I just did.
OPPP: Empire of the Lasers
May. 17th, 2017 01:58 pmAnother post I meant to make a while ago... George, my Tiniest of Tinies, has taken a liking to lasers and mirrors.
eBay and Amazon advertise a number of little Chinese 'optics experiments' kits with a laser line source that makes three parallel beams, a number of partially frosted lenses, prisms and mirrors, and a few other fun things. There's no English version but it looked like a good gift anyway.
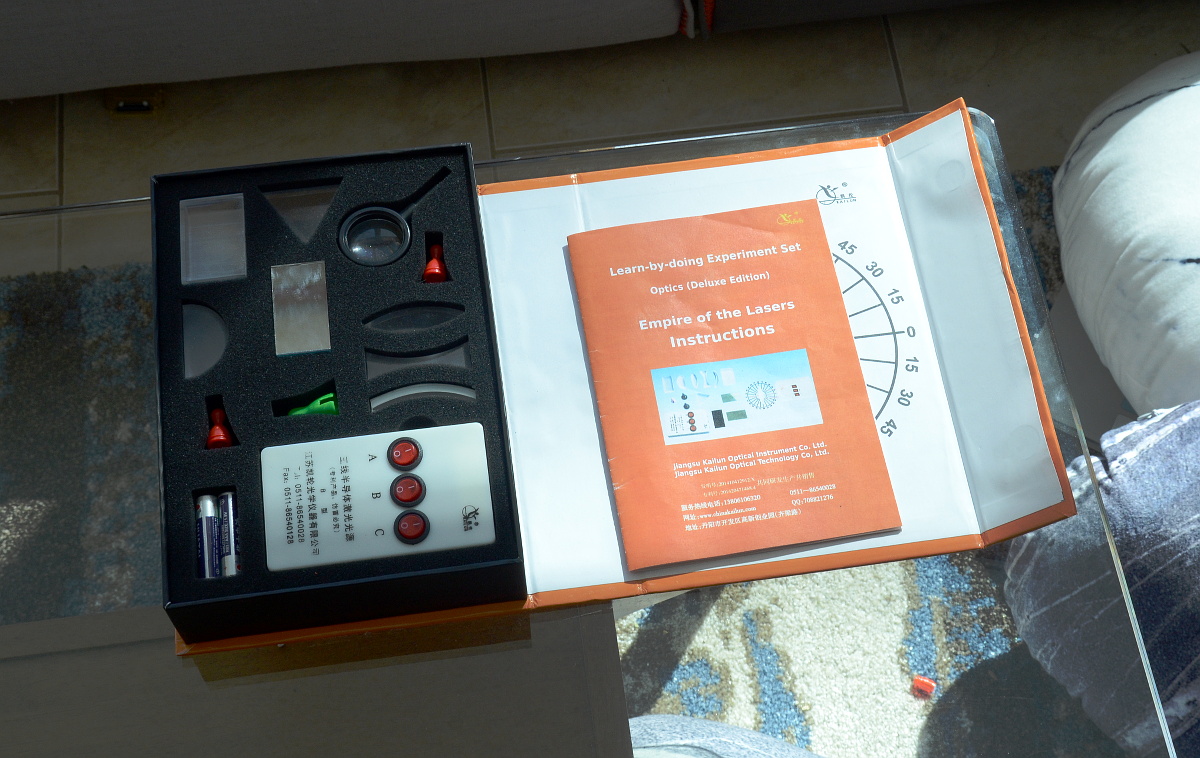
Using Google's realtime image translate and no knowledge of technical Chinese whatsoever, I cobbled together a partly translated box and a translated instruction manual. Unless the original Chinese was quite subtle, I don't think there was actually a ton of useful content there, but hey.
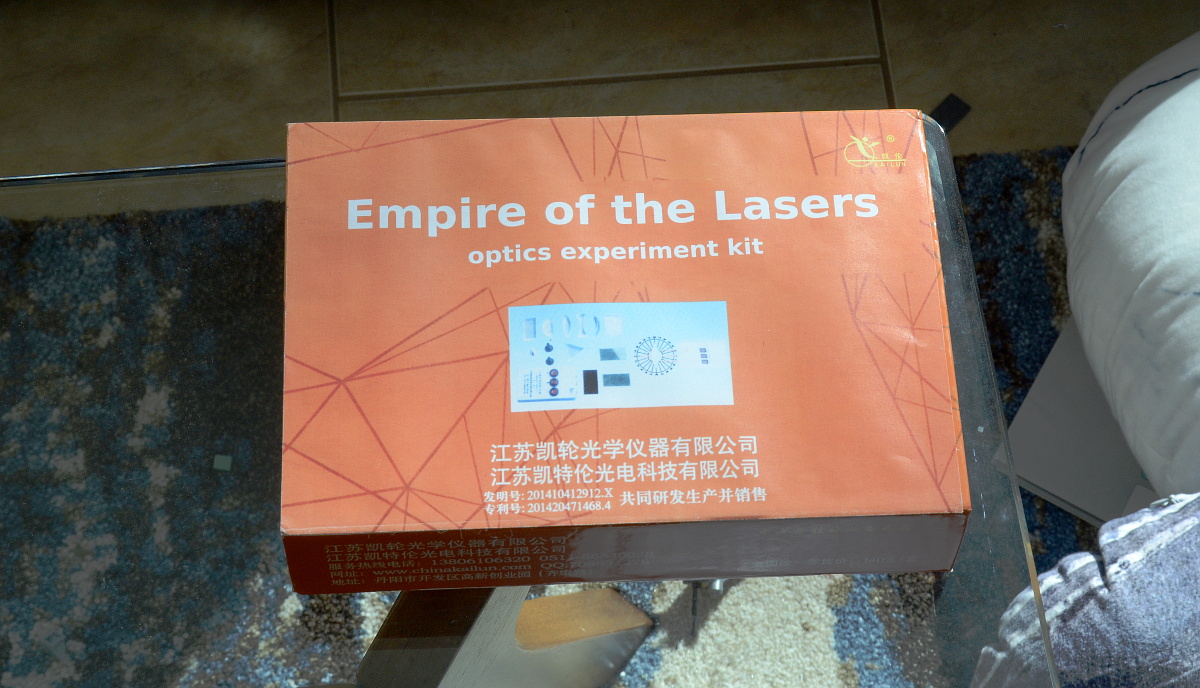
In any case, here's scans: My English translation, and the original Chinese pages (in the event someone would like to improve on my atrocious hack job). Given the Amazon comments, I expect a few others may be interested :-)
(Empire of the Lasers has nothing to do with the original Chinese. It's a silly take on George's usual gaming handle.)
OPPP: Endpoint of Meter Wanking
Apr. 1st, 2017 12:24 amMeters (and digital displays) are nice for detailed readings when you're standing right in front of them, but I still want to know what's going on from across the room, especially with a laser cutter using an experimental cooling system as likely to go horribly awry as work perfectly.
A nice, brightly lit meter that changes illumination color based on the potion of the scale it's in does the job nicely. Part readout, part indicator light, and it's no worse than a regular meter for the colorblind
OPPP: OK, this is new unwork
Mar. 21st, 2017 08:32 pm....and, of course, immediately after mastering the water slide decal-fu, I discover the laser printer will, with no intermediate steps, print and fuse directly to the polyester diffuser sheet thankyouverymuch.

Ah well. Knowledge gained for next time. Hmmm.... I wonder upon what else this thing will print directly.
<img src="banana.jpg">
OPPP: Water slide decals
Mar. 14th, 2017 10:30 amFirst try went surprisingly well, but not perfectly, so of course I spent a day or two dialing everything in for future reference. The directions on the package leave out a few helpful tips.

Paper setting
Most importantly, the instructions stress over and over that a laser printer can melt the decal medium*, and so recommend settings that... did not work well in my particular printer.
I have a Color LaserJet MFP277dw, a popular choice for home printers right now (and I'm pretty happy with it). This printer has a low-temp fuser, and the recommended 'plain paper' setting for decals wasn't fusing the toner to the decal sheet reliably. The print tracked down the page (left side of the pic), and also tended to rub off after printing. The slower, higher-temperature 'transparency' setting works perfectly (right side of pic), and the print is durable to rubbing and scraping. Win.
Soaking and sliding
Secondly the instructions recommend soaking in hot water (good idea) for 20-30 seconds (in boiling hot water, maybe). I found a minute to be more like it, it depends on the actual temperature. Ideally, pull the decal out just before the edges start lifting from the backing.
The decal itself appears to be a vinyl of some sort. When it's hot, it's stretchy and pliable. When it cools back down, it becomes fairly stiff. In the usual 'building models' case, you probably want the label to conform to the target surface, so slide and apply while hot (being careful not to stretch the decal entirely out of shape).
For my use (meter scales) I want the decal to preserve its dimensions exactly. Letting the decal cool to room temperature before application works perfectly!
*The decal media is Papilio Laser Water-slide Decal Paper from texascraft.com. I've been using various specialty Papilio inkjet and laser media for more than ten years and have always been happy with them. These days it needs to be said: I've not been paid for any kind of endorsement, and have not been gifted any free or discounted product. I'm just a happy customer. There may be better stuff out there, but I've not bothered to look for it--- and that's coming from a perfectionist who's never satisfied with anything.
OPPP: Laminating Plexiglas
Mar. 13th, 2017 10:50 am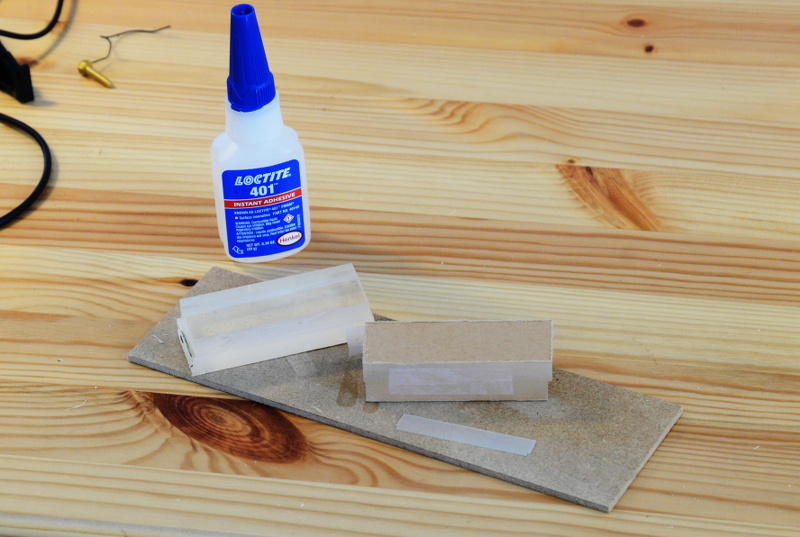
I needed a few chunks of acrylic that were a little thicker than anything in my supply closet. Cyanoacrylate (superglue) bonds PMMA nicely, makes an optically clear joint, is easier to work with than acrylic-specific solvent glues, and doesn't add nasty internal stresses to the plastic.
On the downside, the bond isn't quite as fast (I suppose this is just as easily an upside) and the index of refraction of the glue won't be quite the same as the sheet. A perfect joint will still be noticeable right around the critical angle where seam's angle of total internal reflection will be a little different from the rest of the plastic.
IMHBCO that's small price to pay for getting perfect, strong, bubble-free joints every time without getting light-headed indoors.
Pic related: two in-progress parts curing and my go-to favorite CA glue. Once the glue is fully cured, I'll mill and polish them into rough lenses.

I hate to do this to a nice indicator made in the US, but it's the year 2000+17 and still no one has digitized any of the classic industrial control typefaces used by American manufacturers in the early- and mid-20th century.
A few used Futura or a close knockoff, but that sticks out a little too much. And no, Sublime is not a valid answer either. I used Leroy pen sets. Sublime is neither authentic nor true to purpose, it's just a more subtle kitch font.
OPPP: Unboxing Bread
Feb. 28th, 2017 08:59 pmThis is my version of reclaiming childhood through eBay.
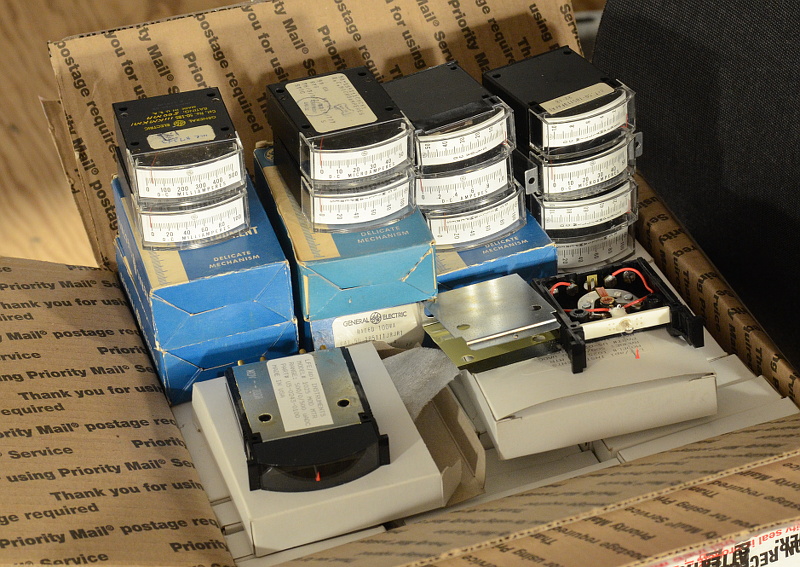
Some people collect old video games, others old equipment... I used to leaf though control indicator catalogues like they were porn rags, hence, this babby duck's lifelong fascination with analog meters and LEDs. It's the industrial design I grew up with. No color LCD screen can compare.