xiphmont: (Default)

First, the big if belated news: I'm now selling complete kits for T-series machines from the T20 through T500, as well as the W500. Oh, and let's not forget the T70. I do need to update the kits webpage to reflect all the new models.

This adds to the X-series kits I already offer for the X20 through the CCFL versions of the X200. And yes, the X62 as well.

That said, I'm waiting on an order of LEDs from Nichia. My most recent order collided badly with the beginning of Golden Week, so the arrival ETA is around May 30th. I won't be able to build new kits until then, and the buyers queue is currently about a week deep.

xiphmont: (Default)

spoiler: Nichia Rocks. But first a flashback.

Remember those crazy Chinese LEDs I was looking for? They had kind of iffy construction, but up to that point they were the closest color match I could find to what I needed for my Thinkpad backlight project. I found more of the same type from random Chinese resellers, but none with exacly the same whitepoint as the original. I never determined the manufacturer.

I was looking for these dodgy Chinese LEDs because I couldn't get any major manufacturers or resellers to sell me the LEDs I needed in any kind of reasonable quantity. The smallest amount any factory quoted was a MOQ of 100,000 and that was only because a friend of a friend was willing to call in a favor to an unnamed factory in Hebei. The name brands you'd recognize weren't willing to discuss anything less than 1,000,000 units.

Or so I thought. I'd stopped looking slightly too early.

The AFFS LCDs I'm retrofitting have red and green filters with a lot of overlap in the yellow region because the original CCFL backlight doesn't put out much yellow. The broad yellow peak from typical white LEDs pollutes the red and green primaries. That messes up the saturation and color reproduction, even if the white point is correct.

But last year Nichia released a new line of component phosphor LEDs specifically designed for backlighting that don't use a broad yellow phosphor; they use separate red and green phosphors.

The specs also claimed tight binning, surprisingly high lumens/watt, and a weirdly low forward voltage. Oh, and they came in a low-profile 3014 package rated for mid-power output.

With no great optimism, I called up Nichia USA and asked for some samples. After being redirected a few times, I talked to a nice lady in Detroit who was happy to send me some LEDs for testing. That was farther than I expected to get.

The LED samples were everything the specs claimed them to be. I had never tested an LED as efficient, or with color binning so tight. They blew everything else out of the water.

So I called back. "What was the minimum order?" The answer: 1 reel, only 5,000 LEDs. Too good to be true.

The next question I was sure would undo me: "Can you tell me if I order now, what kind of bin I'll get?" I was still expecting to get something in the rough ballpark of what I really wanted that I could then tweak a bit with a filter. The reply: "What do you mean? You can have any bin mentioned on the spec sheet."

I could select specific whitepoint, forward voltage, and luminosity bin. At only 5,000 quantity. Jaw on floor.

It still felt too good to be true, but Nichia made the LEDs on-demand in Japan when I placed the order, and they arrived in the mail 15 calendar days later.

So as it turns out, I was able to get my dream LED for this silly little custom project. I'm reminded to post this now as there's been steady demand for the resulting Thinkpad backlight retrofit kits, and it's time to order another reel.

xiphmont: (Default)

You can bypass and remove the supervisor password from ThinkPads by shorting two pins on an EEPROM at the right time during boot.

Don't believe it? I didn't either; it never worked for me. It turns out that's only because the contemporary instructions for how to do it are wrong, or rather, they've mutated into a form that only works on some machines. As originally discovered, the hack reliably unlocks any* ThinkPad up to and including the Ivy Bridge models.

*The SL300, SL400, SL500, and G550 do not store the supervisor password in EEPROM, so they're the only exceptions of which I'm aware.

DISCLAIMER: Any discussion of how to crack security on even vintage machines is banned on most ThinkPad forums. So much as mentioning this page can get you banned in some places.

SOME BACKGROUND:
ThinkPads have three types of security passwords.

A 'Supervisor' password (SVP) locks access to portions of the BIOS setup. The machine will still boot to OS., but if the CMOS battery is temporarily removed or dies, the SVP will also lock all power-on access to the machine. It's stored encrypted in a non-volatile EEPROM along with other asset information.

The 'Hard Drive' password protects access to the hard drive. The drive will be physically inaccessible to any machine without the password. [I don't address the Hard Drive password at all here.]

Lastly, a 'Power On' aka 'User' password (UP) locks boot access the machine. It's stored in volatile CMOS settings. Disconnecting the round yellow CMOS battery clears it.

A machine with a User password will almost certainly also have a Supervisor password. Clearing the UP by disconnecting the CMOS battery will cause the machine to demand the SVP at next boot. The 
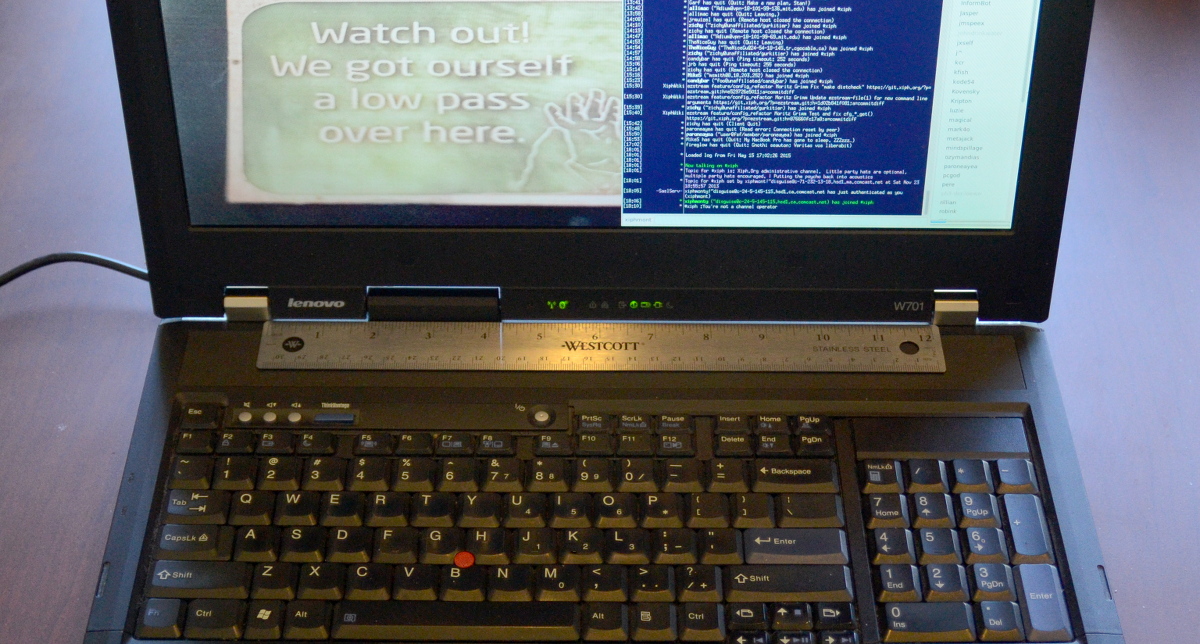
password prompt icons for the UP and SVP are the same on older machines, so if it seems like clearing the User password didn't work, it did-- but now the machine is asking for the Supervisor password instead.

FINALLY THE INSTRUCTIONS:

Step 1: You might as well make life easier by disconnecting the CMOS battery for a few seconds to clear any user password that may be present. Count to 15, reconnect the battery and proceed...

Step 2: Find the physical EEPROM that holds the supervisor password. These EEPROMs have varying numbers of pins. A few examples: On the T23, the chip is a 14-pin Atmel 28RF08. On the X31, the EEPROM is an 8-pin Atmel AT28RF08. On an X61, it's an 8-pin Philips 24S08. On a T60 it's a 40-pin Atmel 8356908.

On some machines you can access the EEPROM just by lifting the keyboard. On other machines, you'll have to disassemble the entire laptop. Locations of many ThinkPad EEPROM chips can be found at http://www.ja.axxs.net/eeprom_location.htm if you don't want to hunt for it.

Step 3: Locate the PROT and GND pins. These are the pins we'll short to subvert the ThinkPad's access to the supervisor password. On a 14-pin Atmel 28RF08, these are pins 5 and 6. On (I think all) 8-pin EEPROMs, these are pins 3 and 4. On the 8356908, it's pins 31 and 32 (pin 32 is actually the write-protect pin, but it will be grounded).

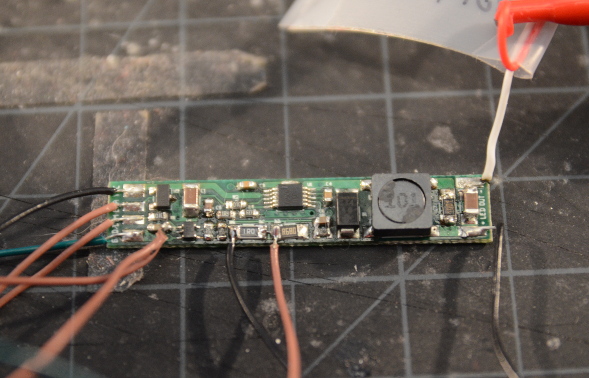
Personally I solder small-gauge wires to the pins to avoid any fumbling around while bypassing the password. If the chip is easily accessible, you can just short the pins with tweezers or a precision screwdriver. Either way, be careful not to short anything you don't mean to short.

[Note: I know I'm telling you to use different pins than virtually all the other instructions on the web. When this hack was first discovered, descriptions simply listed pin numbers for a few models, but it's clear from context that the intended pins were PROT and GND.

At some point, for some reason, reposts started saying to short SCL and SDA instead, possibly due to mixing up pins between 8 and 14 pin EEPROM variants. The mistake was probably cemented by the fact that shorting SCL and SDA does work on some models.]

Step 4: Boot the machine. Upon the 'ThinkPad' logo boot screen appearing, immediately short the pins and press the appropriate key to enter the BIOS (F1 on most models). The BIOS may take longer to appear than normal, and the machine will throw one or more errors; that's expected. It may also ask you to press F1 again (do so). Keep the pins shorted until you're in the BIOS screen, then release the short.

Step 5: Navigate to the BIOS 'Security' menu, then arrow down to the 'Supervisor password' selection, which should currently read 'Enabled'.

Step 6: Short the pins again. While holding the short, press Enter to select the Supervisor password entry, then release the short. It should not ask for the old password, only to enter a new password twice. After releasing the short, press Enter twice to disable the password.

Step 7: Press F10 to save and exit.

Step 8: Before reassembling or desoldering any temporary wires, reboot and test that you can enter the BIOS without any password.

Done!

xiphmont: (Default)

"Whaaaat?" you say, "dispcal works just fine with the W701's built-in calibrator under Linux." Well, it should...

Problem is, the BIOS shuts off the LCD when you close the lid. I've not found a user-exposed LCD or backlight control in Linux, sysfs or otherwise, that does a gosh-darned thing when the lid is closed. I'm not aware of anyone else who's found one either. If someone out there knows of an existing software interface, please let me know!

Until I find the 'correct' software solution, there's an easy hack to make it work:

The W701's lid sensor is on the status led board to the right of the suspend indicator. A stainless steel ruler placed between the hinges blocks the magnet in the base, preventing the lid switch from turning off the LCD. TADA! Dispcal et. al. can do their magic.

(Aluminum and austenitic stainless steel won't work. A magnet has to stick to it. Fortunately the cheapy stainless rulers sold by e.g. Staples and Michaels fit the bill nicely.)

xiphmont: (Default)

There are so many posts that need to come out of this one...

I ordered a whole bunch of Chinese LED conversion kits. I tried lots of ways to mod them to work on Thinkpads, all of which worked... though many turn out not to work well enough, so don't use the mods on those pages for now :-(

Dissatisfied with all offerings, I designed and have been testing my own LED driver boards....

The LED strips that came with the Chinese kits all had terrible color rendering (low temperature, greenish, or both) on the spiffy AFFS screens the X61T is known for.

...so that's sucked me into the world of spectrometers, reverse engineering the protocols to use them on Linux (oh, yeah, I need to publish that), binning leds by hand with a makeshift integration chamber...

...and then of course all the software needed to take the SPD data from the assembled system and interpret the color data, then plot it, which I just finished today!

That contrast measurement is too low and I know why, the sensor is too close and unbaffled, so it's picking up IPS glow. Time for measurement jig rev 2....

xiphmont: (Default)

In case anyone was wondering what I was doing with all the LEDs recently, I've been converting classic Thinkpads with old, dying CCFL backlights to LED. It's a popular mod, and there are plenty of generic DIY backlight kits out there. Unfortunately, most of these kits don't work as-is, and there are no good instructions, walkthroughs, reviews or comparisons of various kits anyway.

I've just had a great deal of fun fixing that. Consider this a beta-test invitation :-)

Also... I touched the white tape. I touched it really quite a lot.

xiphmont: (Default)

...I had promised a few days ago I would post the X61T disassembly and reassembly pics... :-)

A *ton* of large pics under the cut... )

xiphmont: (Default)

...and take a bunch of pictures doing it :-)

Profile

xiphmont: (Default)
xiphmont

Syndicate

RSS Atom

Most Popular Tags